How to change the bulbs on your Peugeot Partner Tepee II (2017-present): headlamps, indicators, foglamps, rear lamps, number plate and third brake lamp.
Hello and welcome. In this post, we'll look at how to change the bulbs on the Peugeot Partner Tepee II (2017-present). It covers the bulb types fitted, how to reach the front and rear lamps, the side repeaters, the number plate lamps and the third brake lamp. It also explains which jobs should be left to a PEUGEOT dealer or a qualified workshop. This guide covers the Peugeot Partner Tepee II (2017-present), including vehicles produced from 01/03/2017.
What headlight bulb does the Peugeot Partner Tepee use?
The dipped beam and main beam headlamps use a Type C halogen bulb, H4 - 55W. Change it with the headlamps off, wait a few minutes first, and do not touch the glass with your fingers.
Quick Reference
Scroll the table sideways.
Section
In short
Types of bulb
Four bulb types and general safety rules
Front lamps
Headlamp, sidelamp, indicator and foglamp bulb changes
Side repeater
Sealed unit, replace the whole repeater
Rear lamps
Courtesy lamps and rear lamp unit bulb changes
Number plate lamps
Number plate lamps and third brake lamp
Types of bulb
Your Partner Tepee uses four different types of bulb, and each one comes out in a different way.
Scroll the table sideways.
Type
Bulb
How to remove it
Type A
All glass bulb
Pull gently, as it is fitted by pressure.
Type B
Bayonet bulb
Press on the bulb, then turn it anti-clockwise.
Type C
Halogen bulb
Release the retaining spring from its housing.
Type D
Light emitting diode (LED)
To replace the daytime running lamps, consult a PEUGEOT dealer or a qualified workshop.
To reach the front bulbs:
Open the bonnet: reach behind the headlamp unit to access the bulbs.
Refit: carry out the steps in reverse order to refit each bulb.
Close the bonnet: check that it is closed securely.
Before you start, keep these safety points in mind:
Change the bulbs with the ignition off or the battery disconnected. If you disconnect the battery, wait approximately three minutes after changing the bulb before reconnecting it.
Change halogen bulbs with the headlamps off and wait a few minutes first, as there is a risk of serious burns.
Do not touch a halogen bulb directly with your fingers. Use a lint-free cloth.
Condensation inside the headlamps is normal. Regular use of the vehicle clears this misting.
Check that the lamps work properly after each job.
Front lamps
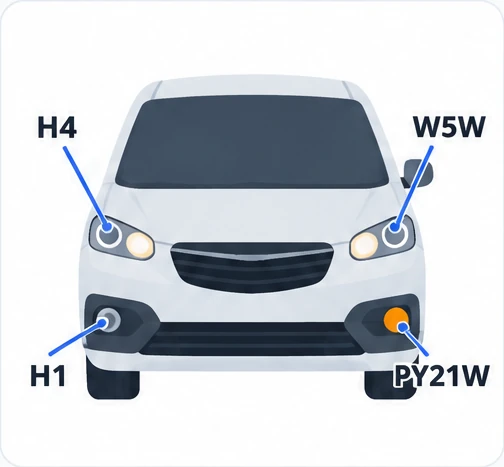
Each front lamp unit contains the dipped beam headlamp (1), the sidelamp (2) and the direction indicator (3). The front foglamps are reached from under the bumper.
Scroll the table sideways.
Lamp
Type
Bulb
Dipped beam / main beam headlamps
Type C
H4 - 55W
Sidelamps
Type A
W5W - 5W
Direction indicators
Type B
PY21W - 21W (amber)
Front foglamps
Type C
H1 - 55W
Dipped beam / main beam headlamps:
Remove the cover: pull the flexible rubber tab to take off the centre cover.
Disconnect: unplug the electrical connector.
Release: free the retaining tab.
Change the bulb: align the metal part of the new bulb with the grooves on the lamp.
Secure: put the retaining tab back in position.
Refit the cover: make sure it sits correctly all the way round so the lamp stays sealed.
Sidelamps:
Remove the cover: pull the flexible rubber tab.
Take out the bulb holder: it is pressure-mounted, so pull it out by the connector.
Change the bulb: fit the new bulb.
Refit the cover: make sure it sits correctly all the way round so the lamp stays sealed.
Direction indicators:
Remove the cover: pull the flexible rubber tab.
Turn the bulb holder: give it a quarter turn anti-clockwise.
Remove the bulb: press lightly on it, then turn it anti-clockwise.
Change the bulb: fit the new bulb.
Refit the cover: make sure it sits correctly all the way round so the lamp stays sealed.
Front foglamps:
Free the mudflap: remove the three clips and the bolt securing the mudflap under the bumper.
Move the mudflap: push it upwards out of the way.
Disconnect: press the tab at the top of the bulb holder connector and unplug it.
Remove the bulb holder: squeeze its two clips, top and bottom, between your thumb and forefinger.
Change the module: replace the bulb holder and bulb together.
Refit: follow the steps in reverse order to refit the module and the mudflap.
If you use a high pressure jet wash on stubborn dirt, do not hold the jet on the headlamps, the lamps or their edges, as this can damage their coating and seals.
Side repeater
The side repeater uses a Type A, WY5W - 5W (amber) bulb, but the repeater is a sealed component, so you replace the whole unit.
Remove the repeater: push it towards the rear, then pull it forwards to free it.
Get a new one: contact a PEUGEOT dealer to obtain a new repeater.
Fit the new repeater: engage it towards the rear, then bring it towards the front.
Rear lamps
This section covers the front and rear courtesy lamps and the bulbs in the rear lamp units.
Courtesy lamps (front/rear): these use a Type A, 12V5W - 5W bulb.
Unclip the lens: insert a thin screwdriver into the slots at each side of the courtesy lamp.
Change the bulb: pull out the old bulb and fit the new one.
Refit the lens: clip it back in place and check that it is secure.
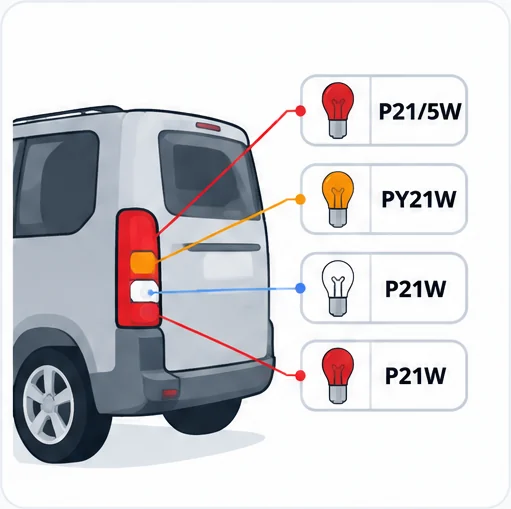
Rear lamp units:
Scroll the table sideways.
No.
Lamp
Type
Bulb
1
Brake lamps/sidelamps
Type B
P21/5W - 21/5W
2
Direction indicators
Type B
PY21W - 21W (amber)
3
Reversing lamps
Type B
P21W - 21W
4
Foglamps
Type B
P21W - 21W
You need the spanner supplied with the wheel-changing tools for this job. see the Changing a wheel section below for more on these tools, and the Side-hinged rear doors section for how to open the doors to 180°.
Find the failed bulb: identify which bulb has failed.
Open the rear doors: open them to 180°.
Remove the bolts: undo the two fixing bolts with the spanner provided.
Pull out the lamp unit: pull it from the outside. With a tailgate, pull it towards the centre of the vehicle. With side-hinged doors, pull it towards you.
Disconnect: while holding the lamp, unplug the electrical connector.
Take out the bulb holder: move aside the 4 tabs, then extract the bulb holder.
Remove the faulty bulb: press it lightly while turning it anti-clockwise.
Change the bulb: fit the new bulb.
When you refit the lamp unit, reposition the tabs and the wiring correctly so the wiring does not get trapped. As at the front, do not hold a high pressure jet wash on the lamps or their edges, to avoid damaging their coating and seals. After changing a rear direction indicator bulb, the reinitialisation time is more than approximately 2 minutes.
Number plate lamps
The number plate lamps use a Type A, W5W - 5W bulb, and the method depends on whether your car has a tailgate or side-hinged doors.
With tailgate:
Remove the lens: lever off the plastic lens with a screwdriver.
Change the bulb: fit the new bulb.
Refit the lens: put the plastic lens back and press on it.
With side-hinged doors:
Remove the trim: unclip the interior trim.
Disconnect: move aside the connector tab and unplug the connector.
Turn the bulb holder: give it a quarter turn anti-clockwise.
Change the bulb: fit the new bulb.
Refit the bulb holder: put it back in place and reconnect the connector.
Refit the trim: put the interior trim back in place.
Third brake lamp: this uses a Type A, W16W - 16W bulb.
Undo the nuts: unscrew the two nuts.
Push the pins: push the pins to free the lamp.
Disconnect if needed: unplug the connector if you need to, to remove the lamp.
Change the bulb: fit the new bulb.
Frequently Asked Questions
What headlight bulb does the Peugeot Partner Tepee use?
The dipped beam and main beam headlamps use a Type C halogen bulb, H4 - 55W. Change it with the headlamps off, wait a few minutes first, and do not touch the glass with your fingers.
Can I replace the daytime running lamps on my Partner Tepee myself?
No. The daytime running lamps are LEDs, and consult a PEUGEOT dealer or a qualified workshop to replace them.
How do I change the side indicator repeater bulb on a Partner Tepee?
You cannot change the bulb on its own, because the side repeater is a sealed component. Remove the repeater and get a new one from a PEUGEOT dealer.
Why is there condensation inside my Partner Tepee headlamps?
Condensation inside the headlamps is normal. Regular use of the vehicle clears the misting.
Most bulbs on your Partner Tepee can be changed at home with care and the right tools. Switch off the ignition first, check every lamp works when you have finished, and leave the LED daytime running lamps to a PEUGEOT dealer or a qualified workshop.
Don't forget to follow us on Instagram for more Peugeot guides!
This is an independent guide, not an official Peugeot publication. If in doubt, contact a PEUGEOT dealer or a qualified workshop before carrying out any work.
Hello and welcome. In this post we cover the 12 V battery on the Peugeot Partner Tepee II (2017-present). We look at locking and unlocking the doors by hand when the battery is flat, charging it with
Hello and welcome. In this post we cover tyre under-inflation detection on the Peugeot Partner Tepee II (2017-present). We look at the two detection systems, what to do when the alert comes on, reinit
Hello and welcome. In this post we look at the fuse boxes on the Peugeot Partner Tepee II (2017-present). We cover where the dashboard, underbonnet and additional fuse boxes are, how a fuse is changed