Peugeot 208Updated 16 min read

Peugeot 208 I Climate, Seats and Comfort

How to adjust the i-Cockpit, mirrors, seats and rear bench on your Peugeot 208 I, plus heating, air conditioning and demisting controls explained.

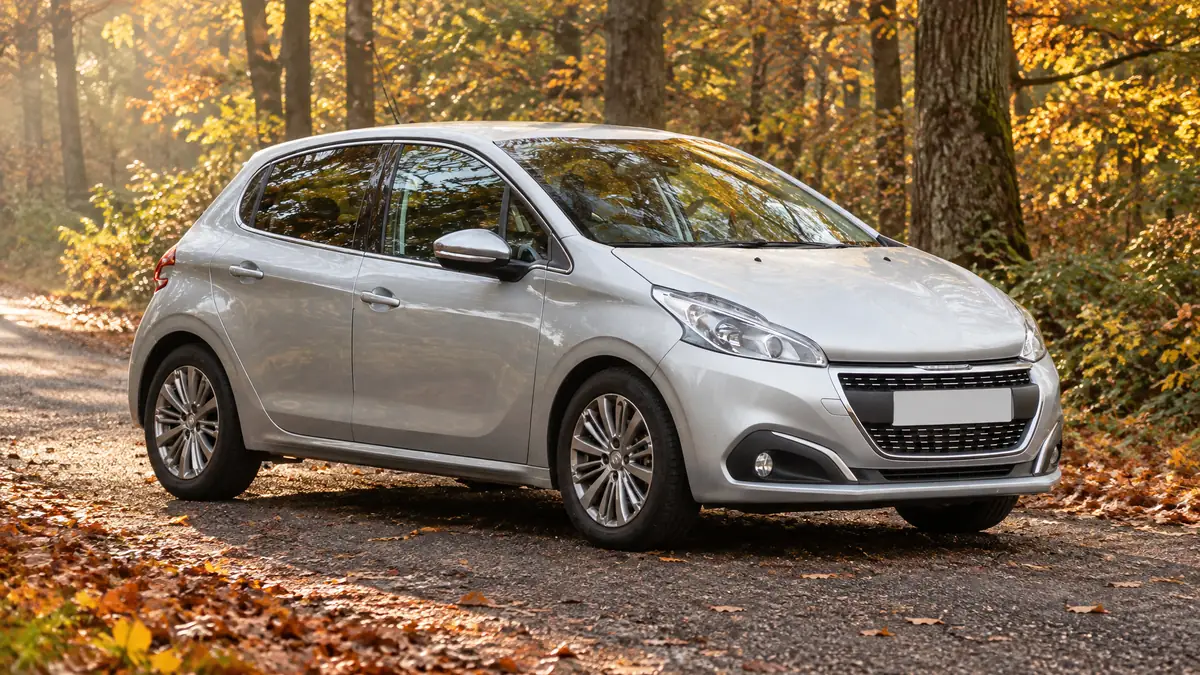
Peugeot 208 (2015-present) on an autumn forest road
Image adapted from a photo by Harvey Bold, CC0.

Hello and welcome. In this post, we'll look at the climate controls, seats and comfort features on the Peugeot 208 I (2015-present). It explains what each control does and the recommended order for setting things up. Some items, such as electric mirrors, heated seats and the type of heating or air conditioning, depend on the version or equipment, so your 208 may not have all of them.

How do I turn on the heated seats in my Peugeot 208?

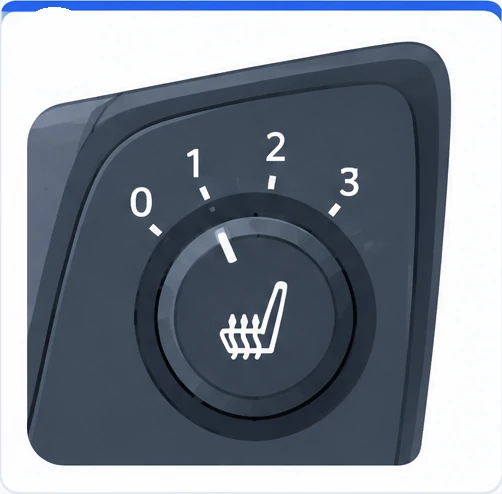
With the engine running, turn the control wheel to 1 (Low), 2 (Medium) or 3 (High), and turn it to 0 to switch it off. Do not use the heating when the seat is empty, when it is damp, or when a child seat is fitted.

Heated-seat control knob: 0 off, 1 low, 2 medium, 3 high

Quick Reference

Scroll the table sideways.

SectionIn short
PEUGEOT i-CockpitSetup order, steering wheel and mirror adjustment
Front seatsSeat, head restraint, heated seat and one-piece bench controls
2/3 - 1/3 split rear bench seatFolding and refitting each split rear backrest
HeatingTemperature, air flow and air distribution knobs
Manual air conditioningManual air conditioning controls and on/off button
Dual-zone automatic air conditioningAUTO mode, left/right temperature, air flow and switching off
Recirculation of the interior airWhen to use recirculation and why to limit it
Front demisting - defrostingClearing the windscreen, side windows and rear screen

PEUGEOT i-Cockpit

The PEUGEOT i-Cockpit has its own specific ergonomics. To get the most from it, adjust your driving position in this order before you set off:

  1. Head restraint: set the height of the head restraint.
  2. Backrest: set the seat backrest angle.
  3. Cushion: set the seat cushion height.
  4. Seat position: set the longitudinal position of the seat.
  5. Steering wheel: set the depth, then the height, of the steering wheel.
  6. Mirrors: set the rear view mirror and the door mirrors.

Once you have made these adjustments, check that you can see the head-up instrument panel correctly over the smaller diameter steering wheel.

Steering wheel adjustment: for safety reasons, only adjust the steering wheel with the car stationary.

  1. Release: pull the control lever to release the steering wheel.
  2. Adjust: set the height and reach to suit your driving position.
  3. Lock: push the control lever to lock the adjustment mechanism.

Door mirrors: as a safety measure, adjust the door mirrors to reduce the blind spot. Keep in mind that objects you see in them are closer than they appear, so take this into account when judging the distance of vehicles approaching from behind.

Manual door mirrors: move the lever in the four directions to adjust the angle of the mirror glass. Fold the mirror by hand to protect it when the car is parked, and unfold it before you move off again. Manual mirrors do not have automatic demisting.

Electric door mirrors:

  1. Select: move control A to the right or to the left to choose the mirror.
  2. Adjust: move control B in any of the four directions.
  3. Finish: return control A to the central position.

The electric mirrors fold when you lock the car with the remote control or the key, and unfold when you unlock it. You can also fold them with the ignition on by pulling control A rearwards, and pull it again to unfold them. If you folded the mirrors using control A, they will not unfold when you unlock the car, so pull control A again. A PEUGEOT dealer or a qualified workshop can deactivate folding and unfolding by remote control. Fold the mirrors before going through an automatic car wash. If necessary, you can fold them by hand.

Rear view mirror: it has an anti-dazzle system that darkens the mirror glass to reduce glare from the sun, the headlamps of other vehicles and so on.

  • Manual model: adjust the mirror so it is aimed correctly in the “day” position. Pull the lever for the “night” anti-dazzle position, and push it to return to the normal “day” position.
  • Automatic “electrochrome” model: a sensor measures the light coming from behind the car and the mirror changes automatically and progressively between day and night use. It lightens automatically when you engage reverse gear, so you have the best view while manoeuvring.

Front seats

Before you move a front seat backwards, make sure nothing will stop it from travelling fully. Passengers in the rear seats could be trapped or pinched, and large objects on the floor behind the seat could jam it.

Standard seat adjustments:

  • Forwards or backwards: raise the control and slide the seat.
  • Height: pull the control upwards to raise the seat or push it downwards to lower it, as many times as needed to reach the position you want.
  • Backrest angle: press the control backwards.

Head restraints:

  • Raise: pull the head restraint upwards.
  • Lower: press lug A and push down on the head restraint at the same time.
  • Remove: press lug A and pull the head restraint upwards.
  • Refit: engage the head restraint rods in the openings, keeping them in line with the seat backrest.

The head restraint has a notched frame that stops it from lowering, which is a safety device in case of impact. It is correctly adjusted when its upper edge is level with the top of your head. Never drive with the head restraints removed: they must be fitted and correctly adjusted.

Heated seats: with the engine running, use the control wheel to switch on and choose the heating level.

Scroll the table sideways.

PositionSetting
0Off
1Low
2Medium
3High

Do not use the heating when the seat is empty, and turn the level down as soon as you can. Once the seat and cabin are warm enough, you can switch it off: using less electrical current reduces fuel consumption.

Keep these safety points in mind:

  • Prolonged use at the highest setting is not recommended for people with sensitive skin.
  • People whose perception of heat is impaired, for example through illness or medication, risk burns.
  • Cushions, seat covers or other insulating materials can make the system overheat.
  • Do not use the heating if you are wearing damp clothing or if a child seat is fitted.
  • To avoid breaking the heating element, do not put heavy or sharp objects on the seat, do not kneel or stand on it, and do not spill liquids on it.
  • To avoid a short-circuit, do not clean the seat with liquid products, and never use the heating when the seat is damp.

Armrest: lift the lever to raise the cover. To reach the storage space in the console, pull the armrest fully up.

One-piece rear bench seat: this bench has a fixed one-piece cushion and a folding one-piece backrest. To fold the backrest:

  1. Front seats: move the front seats forward if necessary.
  2. Seat belts: lay the outer seat belts on the backrest and buckle them.
  3. Head restraints: lower the head restraints to the lowest position.
  4. Release: press both controls 1 at the same time to release backrest 2.
  5. Fold: fold backrest 2 down onto the fixed cushion.

To raise the backrest again:

  1. Raise: lift backrest 2.
  2. Latch: latch it in place. The red indicators on each control 1 are no longer visible.
  3. Seat belts: unbuckle the outer seat belts and return them to their normal positions, ready for use.

2/3 - 1/3 split rear bench seat

This bench seat has a fixed one-piece cushion and a split backrest, left-hand 2/3 and right-hand 1/3. You can fold each part on its own to adapt the load space in the boot. The rear cushion does not fold and cannot be removed: only the backrest folds.

To fold a backrest:

  1. Front seat: move the front seat on that side forwards if necessary.
  2. Seat belt: lay the outer seat belt on that side against the backrest and buckle it.
  3. Head restraint: fully lower or remove the head restraint.
  4. Release: press control 1 of backrest 2.
  5. Fold: fold backrest 2 down onto the fixed cushion.

When you fold the seat, do not fasten the centre seat belt. Lay it flat along the seat instead.

To return the backrest to its normal position:

  1. Raise: lift backrest 2.
  2. Secure: lock it in place. The red indicator in control 1 is no longer visible.
  3. Seat belts: unbuckle the seat belts and reposition them ready for use.
  4. Head restraints: refit the head restraint or head restraints.

Take care not to trap the seat belts when you raise the backrest.

Heating

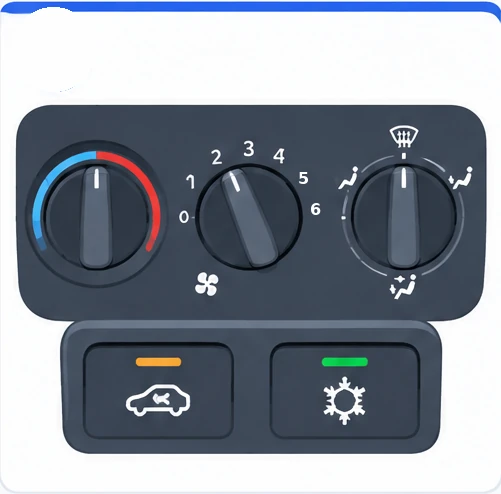
The heating panel has four controls:

Peugeot 208 I manual climate control: temperature, 0–6 air flow, rotary distribution, recirculation and air-conditioning buttons
  • 1: temperature adjustment.
  • 2: air flow adjustment.
  • 3: air distribution adjustment.
  • 4: recirculation of interior air.

Temperature: turn knob 1 from blue (cold) to red (hot).

Air flow: turn knob 2 between position 1 and position 6 to get the air flow you want. If you set it to position 0 (off), the cabin temperature is no longer maintained, although you may still feel a slight flow of air as the car moves forward.

Air distribution: use knob 3 to direct the air to:

  • the windscreen and side windows,
  • the windscreen, door windows and footwells,
  • the footwells,
  • the central and side vents.

You can blend the distribution by setting the knob to an intermediate position.

Manual air conditioning

The manual air conditioning panel has five controls:

  • 1: temperature adjustment.
  • 2: air flow adjustment.
  • 3: air distribution adjustment.
  • 4: recirculation of interior air.
  • 5: air conditioning on/off.

Temperature: turn knob 1 from blue (cold) to red (hot).

Air flow: turn knob 2 between position 1 and position 6 to get the air flow you want. If you set it to position 0 (off), the cabin temperature is no longer maintained, although you may still feel a slight flow of air as the car moves forward.

Air distribution: use knob 3 to direct the air to:

  • the windscreen and side windows,
  • the windscreen, door windows and footwells,
  • the footwells,
  • the central and side vents.

You can blend the distribution by setting the knob to an intermediate position.

Air conditioning: with the engine running and the windows closed, the air conditioning is designed to work effectively in all seasons. It lets you:

  • lower the temperature in summer,
  • make demisting more effective in winter, above 3°C.

Press button 5 to switch the air conditioning on or off. To cool the air more quickly, press button 4 to use interior air recirculation for a few moments, then go back to the intake of exterior air. The air conditioning does not work when air flow control 2 is at position 0. Switching the system off can cause some discomfort, such as humidity and misting.

Dual-zone automatic air conditioning

The dual-zone automatic air conditioning has seven controls:

  • 1: temperature adjustment for the left or right side.
  • 2: air flow adjustment.
  • 3: air distribution adjustment.
  • 4: recirculation of interior air.
  • 5: air conditioning on/off.
  • 6: automatic comfort programme.
  • 7: automatic visibility programme.

AUTO mode: press the AUTO button 6 repeatedly. The active mode appears on the display screen. There are three modes:

  • soft and quiet operation, with limited air flow,
  • the best compromise between a comfortable temperature and quiet operation,
  • dynamic and effective air flow.

When the engine is cold, the air flow builds up to its optimum level gradually, so that too much cold air is not blown into the cabin. In cold weather, the system favours sending warm air to the windscreen, the side windows and the footwells only.

Manual mode: you can change any setting to override the system's choice. The other functions are still managed automatically. When you change a setting, the indicator lamp in button 6 goes off. Press button 6 again to return to the automatic comfort programme.

Visibility programme: for how to use button 7, see the Front demisting - defrosting section below.

Temperature: the driver and front passenger can each set their own temperature. The value on the display is a comfort level, not a temperature in Celsius or Fahrenheit. Push button 1 down (blue) to reduce the value or up (red) to increase it.

  • A setting of around 21 gives optimum comfort.
  • A setting between 18 and 24 is normal, depending on what you need.
  • Avoid a difference of more than 3 between the left and right settings.

For maximum cooling or heating, you can go beyond the minimum value of 14 or the maximum value of 28: push button 1 down until LO is shown, or up until HI is shown. When you get into the car and it is much colder or warmer than your comfort setting, you do not need to change the value. The system compensates automatically and corrects the difference as quickly as possible.

Air conditioning: with the engine running and the windows closed, the air conditioning is designed to work effectively in all seasons. It lets you lower the temperature in summer and makes demisting more effective in winter, above 3°C. Press button 5 to switch it on or off. To cool the air more quickly, press button 4 to use interior air recirculation for a few moments, then go back to the intake of exterior air. The air conditioning does not work when air flow control 2 is at position 0. Switching it off can cause some discomfort, such as humidity and misting.

Air distribution: press button 3 repeatedly to send the air to:

  • the windscreen, the side windows and the footwells,
  • the windscreen and side windows (demisting or defrosting),
  • the centre and side vents,
  • the central vents, the side vents and the footwells,
  • the footwells.

Air flow: press the button 2 Full fan to increase the air flow. The fan symbol on the screen fills in progressively to match the level you choose. Press the button 2 Empty fan to reduce it.

Switching the system off: press the button 2 Empty fan until the fan symbol disappears and "- - -" is shown. This switches off all air conditioning functions. The temperature is no longer regulated, although you may still feel a slight air flow as the car moves forward. Avoid driving for too long with the system off, as there is a risk of misting and poorer air quality. Press the button 2 Full fan to switch the system back on with the settings it had when you switched it off.

Recirculation of the interior air

Drawing in exterior air stops mist forming on the windscreen and side windows. Recirculating the interior air shuts the cabin off from outside smells and fumes, and lets hot or cold air reach you quickly when you need it.

Press button 4 to switch between recirculating the interior air and taking in outside air. When recirculation is on, a symbol appears or an indicator lamp comes on, depending on the version.

Avoid using recirculation for long periods, as there is a risk of mist forming and of poorer air quality.

Front demisting - defrosting

How you clear the windscreen depends on the system fitted to your 208.

  • With heating: set air flow control 2, temperature control 1 and air distribution control 3 to their marked demisting positions.
  • With manual air conditioning: set controls 2, 1 and 3 to their marked positions in the same way, then press button 5 for air conditioning. Its indicator lamp comes on.

With dual-zone automatic air conditioning: use the visibility programme.

  1. Switch on: press button 7 to demist or defrost the windscreen and side windows as quickly as possible. The system manages the air conditioning, air flow and air intake automatically, and sends the air to the windscreen and side windows.
  2. Switch off: press button 7 or button 6 again. The indicator lamp in button 7 goes off and the indicator lamp in button 6 comes on.

The system then goes back to the settings it was using before the visibility programme took over. If your car has Stop & Start, STOP mode is not available while demisting or defrosting is on.

Rear screen demist and defrost: press the button to switch the rear screen defrosting on or off, along with the door mirrors if your car has this feature. It only works with the engine running. Switch it off as soon as you can: lower current consumption means lower fuel consumption.

Frequently Asked Questions

How do I turn on the heated seats in my Peugeot 208?

With the engine running, turn the control wheel to 1 (Low), 2 (Medium) or 3 (High), and turn it to 0 to switch it off. Do not use the heating when the seat is empty, when it is damp, or when a child seat is fitted.

Why don't my Peugeot 208 door mirrors unfold when I unlock the car?

If you folded the mirrors using control A, they will not unfold when you unlock the car. Pull control A again to unfold them.

What temperature should I set on the Peugeot 208 automatic air conditioning?

A setting of around 21 gives optimum comfort, and anything between 18 and 24 is normal. The number is a comfort level, not degrees, and you should avoid a left/right difference of more than 3.

Why does Stop & Start not stop the engine when I demist the windscreen?

On cars with Stop & Start, STOP mode is not available while demisting or defrosting is activated. Once you switch demisting off, STOP mode can work again.

A few minutes setting up your seat, steering wheel and mirrors in the right order makes the PEUGEOT i-Cockpit much more comfortable, and knowing your climate controls helps you keep the windows clear in any weather. Keep this guide handy, and check for full details on your own 208.

More Peugeot 208 Guides

If a lamp comes on while you are driving, see our guides to the Peugeot 208 red warning lights, the Peugeot 208 orange warning lights and the Peugeot 208 green and blue indicator lamps.

Don't forget to follow us on Instagram for more Peugeot guides!

This is an independent guide, not an official Peugeot publication. If in doubt, contact a PEUGEOT dealer or a qualified workshop before carrying out any work.

Related guides: Peugeot 208 model guides.

Cover adapted from a photograph by Harvey Bold — Wikimedia Commons, CC0 (AI edited).
Related guides

Guide ·

Peugeot 208 AdBlue Refilling (2015-present)

BlueHDi Diesel engines on the Peugeot 208 use AdBlue to clean up their exhaust gases. This guide explains what the SCR system does, how far you can drive on a tank of AdBlue, how to store and handle the fluid s…

Guide ·

Peugeot 208 12 V Battery and Jump Starting (2015-present)

A flat 12 V battery is one of the most common reasons a car will not start. This guide explains how to reach the battery on your Peugeot 208, how to start the engine using another battery or a booster, how to c…