Peugeot 5008Updated 16 min read

Peugeot 5008 II Spare Wheel and Tyre Repair Kit

How to use the tool kit, temporary puncture repair kit and spare wheel on the Peugeot 5008 II, with step-by-step instructions and speed limits.

Peugeot 5008 (2017-present) in a mountain lay-by with the boot open
Image adapted from a photo by © M 93, CC BY-SA 3.0 de.

Hello and welcome. In this post, we'll look at where the spare wheel or tyre repair kit is, and how to use it after a puncture on the Peugeot 5008 II (2017-present). A flat tyre is never welcome, but your Peugeot 5008 comes with the tools you need to deal with it. This guide explains where the tool kit is stored, how to use the temporary puncture repair kit, and how to remove, fit and store the spare wheel. This guide covers the Peugeot 5008 II (2017-present), including vehicles produced from 03/10/2023.

Where is the spare wheel on a Peugeot 5008 II?

Depending on the version, the spare wheel or the tyre repair kit is stowed under the boot floor, with the tools beside it.
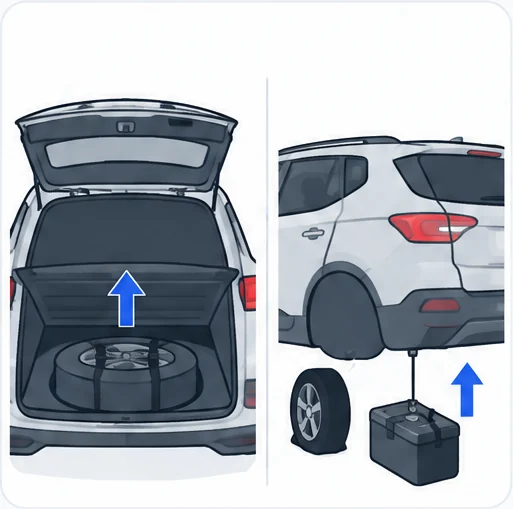
Peugeot 5008 II spare wheel and tool kit stowed under the boot floor

Quick Reference

Scroll the table sideways.

SectionIn short
Tool kitWhere the tools are stored and what each does
Temporary puncture repair kitRepair a tread puncture and check tyre pressures
Spare wheelRemove, fit and store the spare wheel safely

Tool kit

The tools supplied with your 5008 depend on its equipment. You will have either a temporary puncture repair kit or a spare wheel. These tools are specific to your car and may vary with the level of equipment, so do not use them for any other purpose.
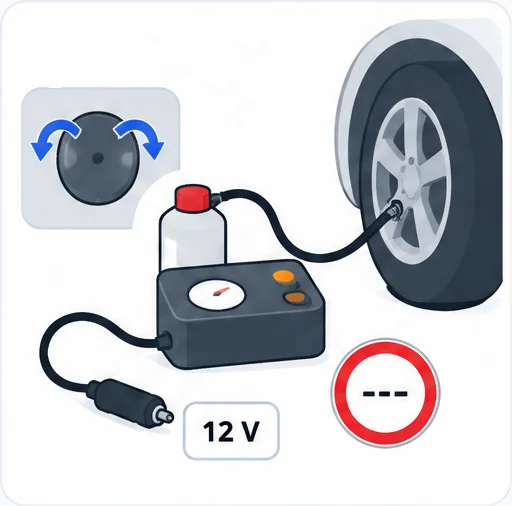
Peugeot 5008 II tyre repair kit: compressor, hose, sealant bottle and 12 V plug

There are two storage layouts. Use the one that matches your car.

Tool kit under the boot floor

On this layout, the tool kit is stored in the boot, under the floor.

  1. Boot: open the boot.
  2. Boot floor height: place the adjustable boot floor in the high position.
  3. Lift the floor: raise the boot floor past the two retractable stops.
  4. Hold it up: rest the boot floor on these two stops.

With the temporary puncture repair kit, unclip the two fixings to open its cover. With the spare wheel, unclip the storage box by pulling it upwards, then unclip the two fixings to open its cover.

Tools against the boot sill

On this layout, some of the tools are stored beneath the floor against the boot sill. The left-hand box holds the wheelbrace and its extension piece. The right-hand box holds the wheel chocks and the towing eye.

  1. Boot: open the boot.
  2. Concertina panels: fold the concertina panels.
  3. Third row seats: install the third row seats, if your car has them.
  4. Tools: unclip the tools you need from the boot sill trim.

On this layout, the temporary puncture repair kit is stored in one of two places:

  • Model without storage box: the kit is in a bag behind the second row left-hand seat. Fold the seat backrest onto the cushion to reach the bag.
  • Model with storage box: the kit is in the storage box in front of the second row left-hand seat. Open the storage box cover to reach the kit.

If your car has a spare wheel on this layout, the tool box sits at the centre of the spare wheel beneath the vehicle. It contains the jack and the wheel bolt cover removal tool.

  1. Spare wheel: first, access the spare wheel, as described in the Spare wheel section.
  2. Unlock the cover: press the tab.
  3. Remove the cover: keep the tab pressed in, slide the cover to the middle and remove it.

List of tools

Scroll the table sideways.

No.ToolUse
1Chocks (depending on equipment)To immobilise the vehicle
2Socket for the wheel security bolts, in the glove box (depending on equipment)To adapt the wheelbrace to the special security bolts
3Removable towing eyeFor towing the vehicle
412 V compressor with cartridge of sealant and speed limit sticker (kit 2, with temporary puncture repair kit)For temporary repair of a tyre and to adjust the tyre pressure
5Wheelbrace (with spare wheel)For removing the wheel trim and the wheel bolts
6Jack with integrated handle (with spare wheel)To raise the vehicle
7Wheel bolt cap removal tool (with spare wheel, depending on equipment)For removing the wheel bolt head finishers on alloy wheels
8Wheelbrace extension (with spare wheel)For loosening and tightening the spare wheel carrier winch cable nut

About the jack:

  • Only use the jack to change a wheel with a damaged or punctured tyre.
  • Do not use any jack other than the one supplied with your car.
  • If your car does not have its original jack, contact a PEUGEOT dealer or a qualified workshop to get the one intended by the manufacturer.
  • The jack meets European standards, as defined in the Machinery Directive 2006/42/CE, and complies with UKCA requirements, as defined by the Supply of Machinery (Safety) Regulations 2008 No.1597.
  • The jack does not need any maintenance.

Temporary puncture repair kit

The temporary puncture repair kit is made up of a compressor and a sealant cartridge. It lets you carry out a temporary repair so that you can drive to the nearest garage, and it is designed to repair most punctures on the tyre tread.

  • Your car's electrical system lets you run the compressor from the 12 V supply for long enough to repair a tyre after a puncture.
  • Only the 12 V socket at the front of the car can be used to power the compressor.
  • The tyre inflation pressures are shown on the tyre pressure label on your car.
  • If you adjust the pressure of one or more tyres, you must reinitialise the under-inflation detection system.

Before you start

Do not remove any foreign body, such as a nail or screw, that has gone into the tyre.

  1. Park: stop the car where it does not obstruct traffic and apply the parking brake.
  2. Safety: follow the safety rules of the country you are driving in, such as hazard warning lamps, warning triangle and high visibility jacket.
  3. Ignition: switch off the ignition.

Connecting kit 2

  1. Valve cap: remove the valve cap from the tyre to be repaired and put it somewhere clean.
  2. Sealant pipe: connect the pipe from the bottle of sealant to the tyre valve and tighten it firmly.
  3. Compressor pipe: uncoil the pipe stowed under the compressor.
  4. Connect the bottle: connect the pipe from the compressor to the bottle of sealant.

Repairing the tyre

  1. Switch check: make sure the compressor switch is in position "O".
  2. Cable: fully uncoil the electric cable stowed under the compressor.
  3. Power: plug the compressor's electric plug into the car's 12 V socket.
  4. Speed limit sticker: affix it inside the car, close to the driver, to remind them that a wheel is in temporary use.
  5. Ignition: switch on the ignition.
  6. Inflate: move the switch to position "I" until the tyre pressure reaches 2 bar. The sealant is injected into the tyre under pressure, so do not disconnect the pipe from the valve during this operation, as there is a risk of blowback.
  7. Switch off: move the switch to position "O".
  8. Unplug: disconnect the compressor's electric plug from the 12 V socket.
  9. Kit: remove the kit.
  10. Valve cap: refit the cap on the valve.
  11. Sealant bottle: remove the bottle of sealant and store it.
  12. Drive: set off immediately and drive for approximately 3 miles (5 kilometres) at reduced speed, between 12 and 37 mph (20 and 60 km/h), to plug the puncture.
  13. Check: stop and check the repair and the tyre pressure using the kit. If the pressure is incorrect, contact a PEUGEOT dealer to have the tyre changed.
  14. Confirm: if the pressure is correct, drive again for approximately 3 miles (5 kilometres) between 12 and 37 mph (20 and 60 km/h), then stop and check the pressure once more to confirm the repair has worked.

If the pressure of 2 bar is not reached after approximately 7 minutes, the tyre cannot be repaired. Contact a PEUGEOT dealer or a qualified workshop for help.

About the sealant:

  • It is harmful if swallowed and irritates the eyes.
  • Keep it out of the reach of children.
  • The use-by date is marked on the bottle.
  • After use, do not throw the bottle away into the environment. Take it to a PEUGEOT dealer or an authorised waste disposal site.
  • Remember to get a new bottle of sealant from a PEUGEOT dealer or a qualified workshop.

With a tyre repaired using this kit, do not exceed 50 mph (80 km/h) and do not drive more than 125 miles (200 km). You must contact a PEUGEOT dealer or a qualified workshop to have the repair checked and the tyre changed.

Checking and adjusting tyre pressures

You can also use the compressor without sealant to check and, if needed, adjust the tyre pressures.

  1. Valve cap: remove the valve cap from the tyre and keep it somewhere clean.
  2. Pipe: uncoil the pipe stowed under the compressor.
  3. Connect: screw the pipe onto the valve and tighten it firmly.
  4. Switch check: make sure the compressor switch is in position "O".
  5. Cable: fully uncoil the electric cable stowed under the compressor.
  6. Power: plug the compressor's electric plug into the car's 12 V socket.
  7. Ignition: switch on the ignition.
  8. Adjust: start the compressor by moving the switch to position "I" and adjust the pressure to the value on the tyre pressure label. To deflate, press the black button on the compressor pipe, near the valve connection.
  9. Switch off: once the correct pressure is reached, move the switch to position "O".
  10. Kit: remove the kit and stow it.
  11. Valve cap: refit the cap on the valve.

If the pressure of 2 bar is not reached after 7 minutes, the tyre is damaged. Contact a PEUGEOT dealer or a qualified workshop for help.

Spare wheel

Depending on your car, the spare wheel is stored either in the boot under the floor, or on a winch system underneath the rear of the car. Use the steps that match your car.

Spare wheel in the boot

To reach it, first follow the steps in the Tool kit section.

  1. Slacken: slacken the central nut.
  2. Fastening: remove the fastening device (nut and bolt).
  3. Remove: lift the wheel out of the boot.

To put it back:

  1. Position: put the spare wheel back in its housing.
  2. Nut: slacken the nut on the bolt by a few turns.
  3. Fastening: place the fastening device (nut and bolt) in the middle of the wheel.
  4. Tighten: tighten the central nut enough to hold the wheel correctly.
  5. Tool box: put the tool box back in the middle of the wheel and clip it in place.

Spare wheel under the car

Only a "space-saver" type spare wheel can be fixed underneath the car.

  1. Boot: fold up the concertina panel and install the left-hand third row seat, if your car has one.
  2. Carpet: lift the pre-cut section of carpet to reach the spare wheel winch nut.
  3. Lower the wheel: fit extension piece 8 on the end of wheelbrace 5, then "tighten" the nut to unreel the winch cable until the spare wheel is flat on the ground. Unwind enough cable to reach the wheel easily.
  4. Remove: take the wheel and tool box unit out from the rear of the car.
  5. Tool box: stand the spare wheel up to reach the tool box (A).
  6. Connecting piece: detach the connecting piece from the tool box cover (B - C).
  7. Release: pass the connecting piece through the wheel hub to free it (D).

To store the tools and reel the winch back in after fitting the spare wheel:

  1. Tools: put the right tools back in the box and close the cover.
  2. Tool box: place the tool box on the ground.
  3. Connecting piece: insert the connecting piece into the tool box hole (B - C).
  4. Reel in: loosen the winch control nut with wheelbrace 5 and extension piece 8. The nut should turn freely once the cable is fully reeled in.
  5. Other tools: store the rest of the tools in the boot sill trim.

The punctured wheel cannot be secured under the car. Store it in the boot and use a cover to protect the inside of the boot.

To put the winch and spare wheel back in place:

  1. Tools: put the right tools in the box and close the cover.
  2. Tool box: place the tool box on the ground.
  3. Wheel: stand the wheel up.
  4. Hub: pass the connecting piece through the wheel hub (A).
  5. Connecting piece: insert the connecting piece into the tool box hole (B - C).
  6. Centre: centre the spare wheel and position it on the tool box (D).
  7. Guide: insert the centring guide into the wheel hub.
  8. Position: place the wheel and tool box unit beneath the rear of the car.
  9. Raise: lift the unit up under the car by "loosening" the winch control nut with wheelbrace 5 and extension piece 8.
  10. Tighten: tighten fully. When the cable is completely reeled in, the nut turns without resistance.
  11. Check: make sure the wheel is pressed flat against the floor.

If you have fitted the spare wheel in place of a punctured one, the winch and tool box must go back under the car before you set off again.

Parking before you change a wheel

  • Stop where the car does not obstruct traffic, on ground that is level, stable and not slippery.
  • With a manual gearbox, engage first gear to lock the wheels. With an automatic gearbox, select mode P. In both cases, apply the parking brake, unless it is set to automatic mode, and switch off the ignition.
  • Check that the parking brake indicator lamps on the instrument panel are on fixed.
  • All occupants must get out and wait somewhere safe.
  • If needed, place a chock under the wheel diagonally opposite the one you are changing.
  • Never go underneath a car raised on the jack. Use an axle stand.

Removing a wheel

If the wheel has a wheel trim, remove it first by pulling with both hands on one of its upper arms.

  1. Bolt covers: on alloy wheels, remove the cover on each bolt using tool 7.
  2. Security bolt: fit security socket 2 on wheelbrace 5 and slacken the security bolt. Never use an impact wrench on the security bolt socket.
  3. Other bolts: slacken the other bolts using wheelbrace 5 only.
  4. Jack position: place the foot of jack 6 on the ground directly below the front A or rear B jacking point on the underbody, whichever is closer to the wheel you are changing.
  5. Extend the jack: extend jack 6 until its head meets jacking point A or B. The contact area on the car must sit properly in the central part of the jack head.
  6. Raise: lift the car until there is enough space between the wheel and the ground to fit the spare (not punctured) wheel easily.
  7. Bolts: remove the bolts and keep them somewhere clean.
  8. Wheel: remove the wheel.

Make sure the jack is stable. On slippery or loose ground it may slip or collapse, with a risk of injury. Always position the jack only at jacking point A or B, with its head centred under the contact area, or the car may be damaged and the jack may collapse, with a risk of injury.

Fitting a wheel

If your car has alloy wheels, washers A do not touch a steel or "space-saver" spare wheel. The wheel is held in place by the conical contact surface B of each bolt.

  1. Fit: place the wheel on the hub.
  2. Bolts by hand: screw in the bolts by hand as far as you can.
  3. Pre-tighten security bolt: use wheelbrace 5 with security socket 2.
  4. Pre-tighten other bolts: use wheelbrace 5 only.
  5. Lower: lower the car fully.
  6. Jack: fold jack 6 and remove it.
  7. Tighten security bolt: use wheelbrace 5 with security socket 2.
  8. Tighten other bolts: use wheelbrace 5 only.
  9. Bolt covers: refit the covers on each bolt (depending on equipment).
  10. Tools: store the tools.

When refitting a wheel trim, line up its aperture with the valve, then push it into place all round its edge with the palm of your hand.

After changing a wheel

With a non-standard or "space-saver" spare wheel:

  • Deactivate certain driving aids, such as Active Safety Brake and Adaptive cruise control.
  • Do not exceed the maximum authorised speed of 50 mph (80 km/h) or the maximum distance of 50 miles (80 km).
  • Never drive with more than one spare wheel of this type.
  • Do not refit the wheel trim from the replaced wheel.

Go to a PEUGEOT dealer or a qualified workshop to have the spare wheel's bolt tightening and tyre pressure checked, and to have the punctured tyre examined. The technician will tell you whether it can be repaired or must be replaced.

Frequently Asked Questions

How fast can I drive on a tyre repaired with the Peugeot 5008 puncture kit?

Do not exceed 50 mph (80 km/h) and do not drive more than 125 miles (200 km). Contact a PEUGEOT dealer or a qualified workshop to have the repair checked and the tyre changed.

How far can I drive on the Peugeot 5008 space-saver spare wheel?

Do not exceed 50 mph (80 km/h) or a distance of 50 miles (80 km). You should also deactivate certain driving aids, such as Active Safety Brake and Adaptive cruise control.

What if the puncture kit does not reach 2 bar?

If the pressure of 2 bar is not reached after approximately 7 minutes, the tyre cannot be repaired. Contact a PEUGEOT dealer or a qualified workshop for help.

Can I store the punctured wheel under the 5008 instead of the spare?

No. The punctured wheel cannot be secured under the car, so store it in the boot with a cover to protect the inside. The winch and tool box must go back under the car before you set off.

Knowing where your tools are and how the repair kit or spare wheel works makes a puncture much easier to handle. Take a few minutes to find the kit in your Peugeot 5008 before you ever need it, and always have the repair or spare wheel checked by a PEUGEOT dealer or a qualified workshop afterwards.

More Peugeot 5008 Guides

You may also find our guides to the Peugeot 5008 red warning lights, the Peugeot 5008 orange warning lights and the Peugeot 5008 green and blue indicator lamps useful.

Don't forget to follow us on Instagram for more Peugeot guides!

This is an independent guide, not an official Peugeot publication. If in doubt, contact a PEUGEOT dealer or a qualified workshop before carrying out any work.

Related guides: Peugeot 5008 model guides.

Cover adapted from a photograph by © M 93 — Wikimedia Commons, CC BY-SA 3.0 de (AI edited).

Related guides

Guide ·

Peugeot 5008 Fuse Box and Fuses (2017-present)

Hello and welcome. In this article we look at the fuseboxes and fuses on the Peugeot 5008 II (2017-present). We will cover where the two fuseboxes are, how a fuse is changed and which fuse protects wh

Guide ·

Peugeot 5008 II Technical Specifications

Hello and welcome. In this post we gather the technical specifications for the Peugeot 5008 II (2017-present). We'll look at engine and gearbox data, towed loads and nose weights, hybrid motor and bat